
Imagine photographing a small bookstore display through a front window just before closing. A bright reflection from a passing vehicle stretches across a stack of books, and street lights partly hide price labels. Lightroom’s AI-powered Reflections control can help reduce window reflections; it cannot independently prove what lettering or merchandise was behind the glare. The goal of this walkthrough is a believable photograph that preserves real display information, not a perfectly spotless window or an invented product description. Work on a duplicate and keep the untouched view for reference.
Separate reflection from subject detail
Study the original at a comfortable zoom before editing. Identify the glass reflection, the actual book spines, the window frame, and any lettering you need to preserve. A reflected traffic light can look like an object on the shelf, while the hard vertical frame belongs to the storefront. Write down which labels are already readable and which are obscured. Do not try to reconstruct missing words with AI. For merchandise or documentary work, an unreadable price should remain unverified; the store owner or a second photograph is the source for that information.
Start with the supported Reflections workflow
In Lightroom or Lightroom Classic, open the image in the editing view, go to Remove, find Distraction Removal, and choose Reflections. Use Apply to let the tool analyze the image. Adobe documents an Amount slider for blending the reflection-removal result with the original. The setting at zero shows the original, while positive settings generally remove more reflection. An unusual file may behave differently, so verify visually rather than treating a slider number as an accuracy score. The editing controls and hardware support can vary with product version; check the Adobe help page if the option is missing.

Compare three visual layers instead of trusting one preview
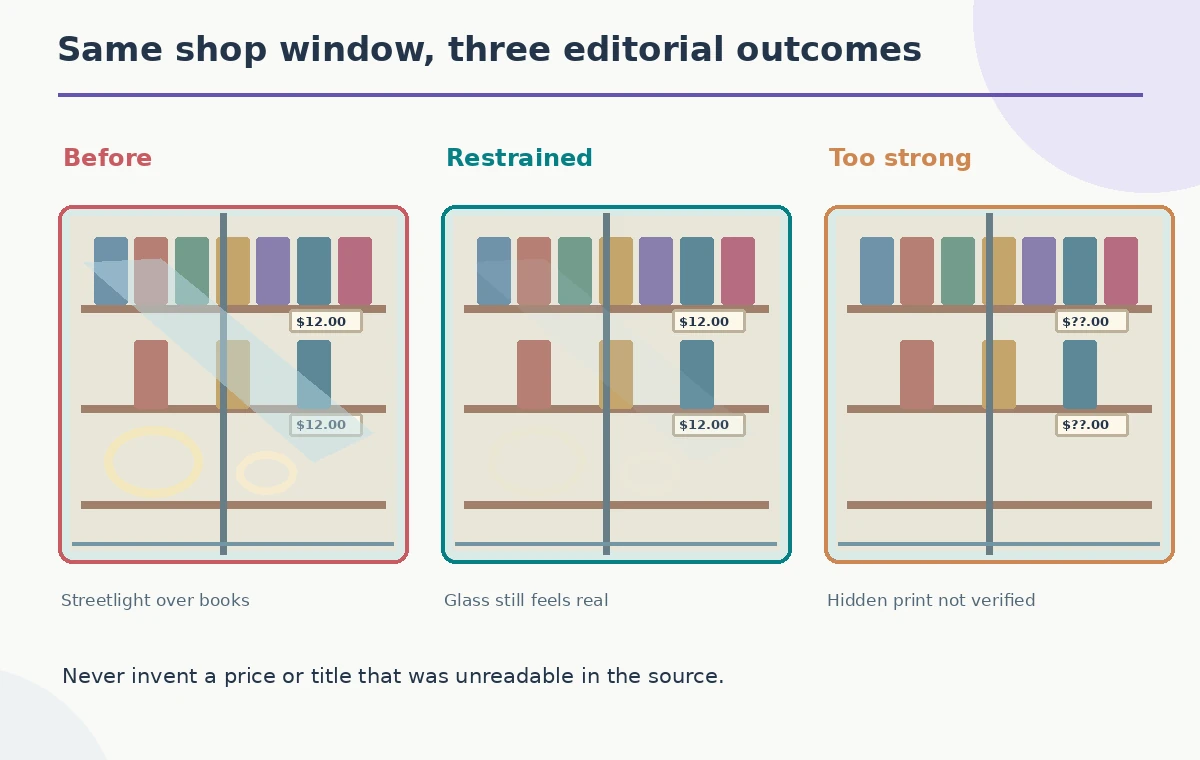
Keep the original, a restrained reflection reduction, and a stronger reduction available for comparison. In the restrained version, the books should remain recognizable while the bright road reflection becomes less prominent. In the stronger version, look for painted-looking patches on book covers, impossible shelf edges, or lettering that seems to have changed. The illustration shows those three conceptual states, not generated output from a real storefront photograph. A pleasing global impression can hide incorrect local detail. Review at the size customers will see and at closer zoom around every label.
Use quality settings as a delivery choice
Adobe lists Preview, Standard, and Best quality options for reflection removal. Preview can make it easier to judge composition quickly; Best targets the highest available resolution but may take longer. Quality names are not evidence that a particular result is correct. Choose the mode appropriate for your export and available hardware, then examine the finished image rather than approving a thumbnail alone. The documentation also identifies a Windows-on-ARM limitation in Lightroom Classic. Avoid promising the exact same controls or performance to every editor; verify the installed version first.
Protect signage, labels, and the window frame
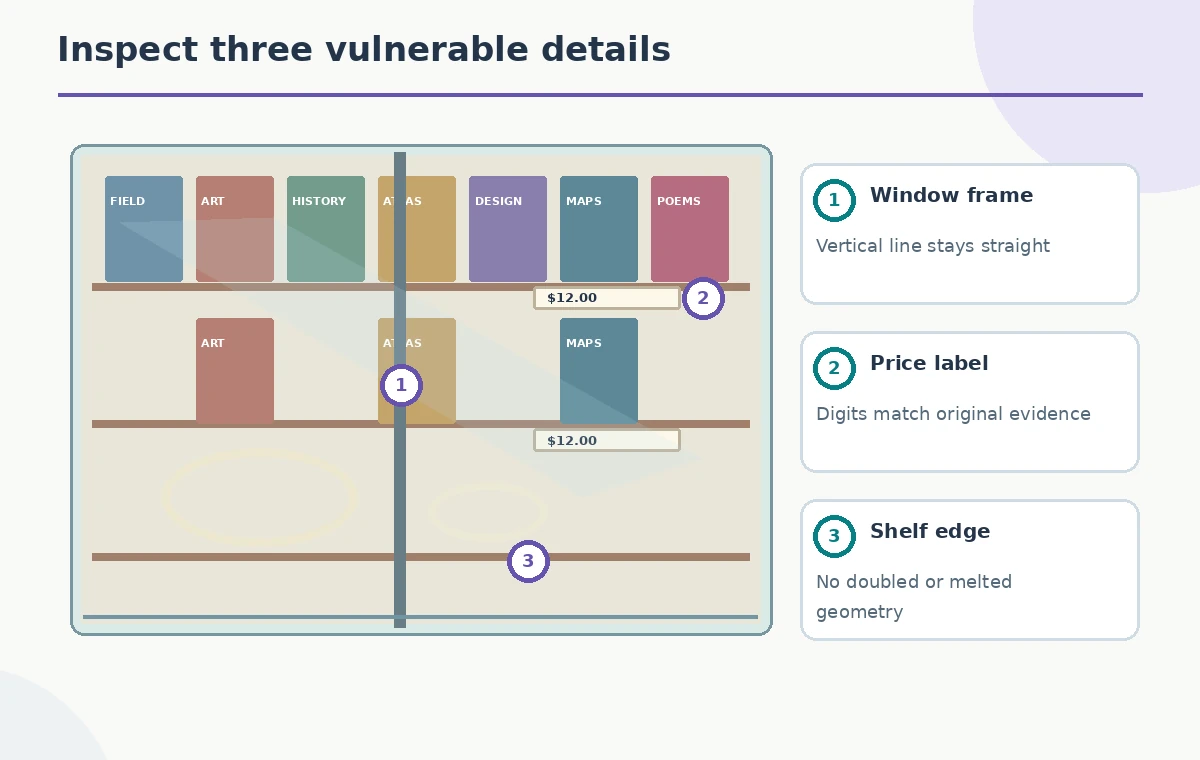
A shop-window photo contains straight verticals, repeated shelf geometry, and tiny printed labels that are easy to distort. Look first at the letter shapes on the largest visible title, then along the window mullion and shelf edge. Compare any edited detail against the unmodified image, not against an AI-imagined complete scene. If a reflection masks the final digit of a price, do not manually infer the digit. Consider cropping away that label, photographing it separately, or disclosing that it is obscured. Accurate merchandising information matters more than an immaculate patch of glass.
Watch for reflections that help explain the scene
Some reflections tell the story of the storefront: evening traffic, glowing signage across the street, or silhouettes of pedestrians. Removing every trace can make a window appear physically implausible, especially when the pane still shows dust or highlights around the frame. Compare whether the remaining glare falls naturally relative to visible light sources. A partially reflective window may feel more truthful than a perfectly clear one. If the image is for a store listing, prioritize product visibility; if it is for street photography, preserve the atmosphere instead of treating all reflections as defects.
Avoid changing facts during a marketing handoff
Before sending the edited image to a store manager, separate photo cleanup from factual approval. The editor can reduce glare, straighten a crop, and adjust exposure, but cannot certify an ISBN, a price, or an edition visible only after reconstruction. Use an approved inventory list to verify marketing copy and ask the manager to confirm that the depicted arrangement matches the real display. Do not claim the original view was clear if it was not. Keep the original file alongside the revision so later reviewers can distinguish camera evidence from image processing.
Inspect seams with a repeatable close-up checklist
Move slowly across the boundaries of the window frame and the front row of books. Check for doubled edges, abrupt haze, stretched cover artwork, and letter shapes that are unusually sharp compared with neighboring details. Reflections may be brighter near one end of a pane, so a uniform removal can expose uneven texture. Make a second pass with the Amount slider reduced; that often gives a useful comparison. The three numbered hotspots in the diagram refer to the glass edge, product label, and shelf line, not to any machine-generated quality metric.
Export an honest and useful photograph
Export for the intended page or handout at a resolution that keeps the product recognizable. Check the final file outside the editor, including any crop or responsive resizing that might hide a critical label. Retain original metadata where appropriate and store the original in the project archive. If you cannot confidently verify newly revealed details, prefer a more conservative reflection reduction or a different photograph. The strongest outcome is a readable shop-window scene with consistent geometry and no claims beyond what the underlying image and approved store information support.
Know when to stop editing
Reflection removal is not a substitute for reshooting a badly obstructed photograph. When the reflected car completely covers a book title, the algorithm lacks reliable visual evidence for that area. You could improve the composition without resolving that factual gap. If a product listing depends on precise print or color, take an unobstructed close-up through an open door or from a different angle. Treat the AI tool as an assistive retouching step, not an authority about hidden merchandise. This distinction should guide both the artwork and the final caption.
How We Research
This article was researched against the current official guidance: Adobe Lightroom Classic Reflections guidance and Adobe Lightroom distraction-removal tutorial. We compared documented workflow steps, version or subscription limits, and stated capabilities with the specific editing decisions in this hypothetical scenario. We did not open a paid account, process the described media, inspect a real project, time a render, or assert measured results. All visuals in this guide are explanatory drawings, not screenshots or recordings of a completed tool run. The editorial assessment is source-based; no paid account, hands-on benchmark, or measured before-and-after result is claimed. Review the current vendor documentation again before a production run because interfaces and entitlements can change.
Frequently Asked Questions
No. The feature reduces reflections but cannot independently verify lettering hidden by the original glass glare.
Adobe documents support for both raw and non-raw images, but quality and available controls can depend on the installed application and file.
A restrained Amount setting may intentionally preserve some real glass appearance; stronger removal is not necessarily more faithful.
Use Preview for a quick composition check and a suitable higher-quality setting for the final export, then inspect the delivered file.
Do not invent the missing characters. Verify the price independently or remove the unsupported claim from the composition.