
A community bike workshop needs a volunteer-recruitment flyer with a bicycle photographed against a cluttered storage wall. A clean cutout would give the designer more freedom, but thin wheel spokes, brake cables and reflections are easy to erase or distort. Figma AI Remove Background can help separate the subject from the scene, yet a successful cutout must still preserve the bicycle’s actual geometry. This guide uses a fictional bicycle and vector diagrams to explain a manual quality-control workflow, not a real Figma test or screenshot.
Choose a usable source photograph and protect the master
Start with a photograph where both wheels, frame, pedals and handlebars are visible. Check that the workshop has permission to use the photo and that no identifying details appear on a nearby label or poster. Save the original in a read-only asset folder, then make a copy for layout. A blurry cable or a spoke hidden by shadows may not survive automatic isolation; even careful editing cannot reconstruct what the source never clearly showed.
Before removal, decide what the composition needs. A flyer may require the full bicycle, or it may use a detail of the front wheel. If the output must imply a specific model for donation or sale, do not replace missing features with guesses or decorative strokes. Record the wheel arrangement and visible accessories so the editor can recognize errors later. A colorful background can make missing spokes seem invisible until the final export.
Find the documented Figma AI removal control
Figma documents Remove background in its image editing tools across products including Figma Design and Figma Slides, with variations in toolbar placement. Select an image, find the secondary-toolbar command where available and make the change to the working copy. Figma says that file edit access is required for image generation and editing tools, and some functionality is limited by plan or product. Do not assume that every collaborator will see the same option.
The feature is part of Figma’s AI credit system. Official documentation lists credit use for background removal and warns that rates can change, so review the current account limits before processing dozens of images. A small series of proof edits is more useful than running batch changes on a whole asset library. The goal is an editable design with verifiable source geometry, not simply a transparent background icon in the layer list.
Isolate the bicycle with a contrasting inspection canvas
Apply background removal to a copy of the bicycle photo and place the resulting image on two contrasting solid surfaces, one light and one dark. The alternating background reveals pale halos and unwanted leftovers from the storage room. If the removed area includes a thin brake cable, note that explicitly before continuing. Keep the original visible on a separate layer so comparisons do not depend on memory. Avoid painting over the entire output before the initial audit.
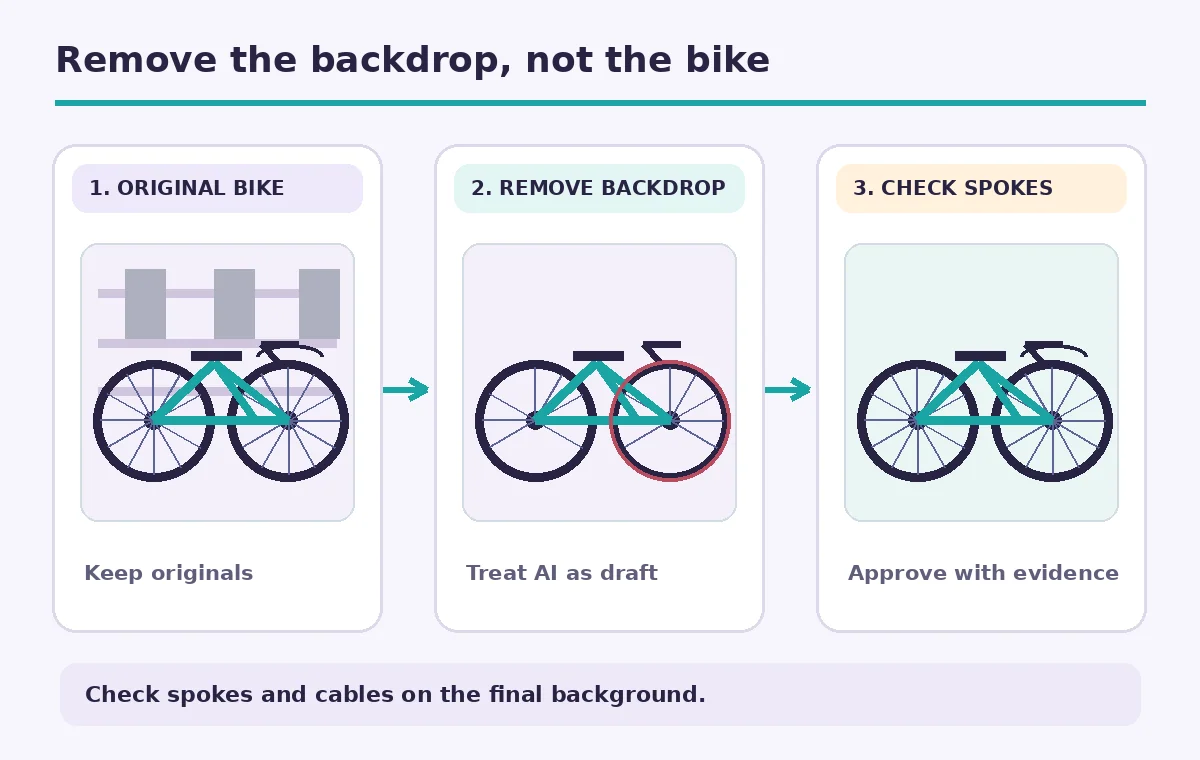
The workflow illustration shows the source photo, an AI-assisted cutout and a human edge review. The subject is drawn using wheels, spokes and a frame rather than the same rectangular image repeated. Those graphic states are deliberately schematic. Figma’s actual quality will depend on source resolution, subject contrast and tool behavior; no claimed percentage of preserved spokes or cables appears in this guide.
Inspect every spoke, cable and chain intersection
Zoom in around both wheel rims and trace the spokes from hub to rim. Look for missing lines, doubled spokes, spokes that stop halfway and gaps that have been filled with an opaque patch. Follow brake cables around the frame and handles, especially where a black cable crosses a dark background. Check the chainring, pedal and the narrow triangle formed by the fork. These are high-risk places because automated masks may treat thin components as background.
The before-and-after schematic shows a wheel with missing spokes on the left and a faithfully outlined wheel on the right. These are not measured outputs. A cutout can look convincing at social-feed size while failing at print size, particularly if the bike is meant to illustrate a repair step. Compare at actual planned export dimensions and at a larger zoom. If geometry is missing, use the original photo or manual editing instead of disguising it with a new invented spoke.

Inspect ground contact and avoid floating-bike effects
Background removal can erase the ground shadow that visually anchors the wheels. If the promotional flyer needs a shadow, it should be an obviously designed graphic consistent with the visual style rather than a claim to reproduce the exact original lighting. Do not copy a shadow from a different bicycle and present it as photographic evidence. A simple color field and separate caption are often enough to make the bicycle readable without suggesting it was photographed in a different environment.
Position the bicycle with clear margin around the tires, handlebar and saddle. Keep the recruiting text away from cables and avoid placing a call-to-action across the frame. Check that a light background does not wash out polished metal parts and that dark areas do not swallow the tire outline. If the object is a workshop-owned item with damage, preserve that damage in the picture rather than retouching it out to make the donation appeal more attractive.
Choose manual correction or a different asset when needed
If the cutout loses many spokes, re-run the edit only if a better source or a changed framing can help. Repeated AI removals may cost credits without meaningfully improving the image. Manual masking in an image editor or using the original background may preserve truth more reliably. In Figma, separate any manually drawn accent lines from the photograph so viewers do not mistake graphic repair for an accurate depiction of the bicycle.
When the workshop has multiple photos of the same model, choose the cleanest photographic source instead of compositing parts across different bikes. A replacement handlebar might be mechanically plausible but factually wrong for the item pictured. The image is an invitation to an event, not a product specification, yet it still should not mislead viewers about the workshop’s equipment or the condition of a donated bicycle.
Check accessibility and export dimensions
Write alt text that describes the visible bicycle and the volunteer action, not the AI process. A suitable description might identify a blue commuter bicycle used in a community repair flyer, assuming the color and type are visible and approved. Test the layout at mobile width, print size and high contrast. Verify that any text over or near the cutout remains readable. Keep text-based contact details as real editable text rather than baking them into the image.
Before export, confirm that the alpha edges do not show white or gray halos on the final brand background. Inspect the transparency in the actual file format the team will use and verify that a printer has not added unwanted matte color. If exporting a raster graphic, preserve sufficient resolution for the intended use. Maintain a link to the untouched original photograph as an audit reference for any future design changes.
Run the final geometry and publication audit
Use an itemized review: both wheels circular, spokes count visually plausible and consistent with the source, cables continuous, frame triangle intact, shadow intentional, and no background fragments left near the handlebars. Have a second reviewer compare source and export without knowing which was made with AI. The reviewer should be able to point to any discrepancy rather than simply calling the output professional-looking. Record what was fixed manually and what could not be fixed.
The final annotated figure highlights the wheel hub, brake cable and tire edge. Its labels are an educational risk map, not a Figma screenshot or a demonstration of a completed live edit. If any important structure is damaged, hold the image and use the original. Publishing a slightly busier but accurate bike photo is preferable to a clean graphic that silently changes the physical object.

How We Research
For this guide, we reviewed named official product documentation: Figma, Generate and edit images with Figma AI; Figma, How Figma AI credits work. We used these publisher sources to verify feature naming, menu locations, supported workflows, access constraints and stated limitations rather than treating marketing claims as performance measurements. This article presents a fictional editorial scenario with hypothetical names, numbers, pictures and comparison states. We did not use a production account, conduct controlled image or transcription tests, obtain real permission, or measure output accuracy. Current entitlements, menus, credit usage and generated results can change. Recheck the live documentation and verify all operational facts against the primary records before publishing or approving the work.
Frequently Asked Questions
Yes. Figma documents a Remove background image-editing feature, subject to applicable permissions and access rules.
No such guarantee exists. Inspect spokes, rims, brake cables and other fine edges against the original photo.
Yes. Figma lists credit consumption for the feature, with rates that may change. Check current entitlement and balance.
Prefer a better source or faithful manual mask. If a graphic reconstruction is used, do not present it as unchanged photographic evidence.
Verify object geometry, transparency edges, readable text, usage rights, contact details and final export dimensions.