
Adobe Firefly Generative Fill is most useful when a genuine image is already close to production-ready but needs a narrowly defined change. It is not a substitute for confirming a product’s dimensions, ingredients or packaging. This guide uses one hypothetical marketing task—a photographed reusable water bottle that needs a cleaner background—and offers a repeatable edit record rather than promising a perfect one-click result. The workflow below reflects Adobe’s documented Firefly interface as checked October 27, 2026; account menus and model availability may differ.
Start with a source image and a no-change list
Save a copy of the original photograph before touching the editor. Record its owner, approved use, file dimensions, and the marketing placement for which it was shot. For a product image, make a no-change list that includes the bottle silhouette, lid mechanism, finish, logo, printed measurement marks, and exact color. Those features are facts about the merchandise, not creative suggestions. A generated version of a logo or measurement scale is not evidence that the product exists in that form.
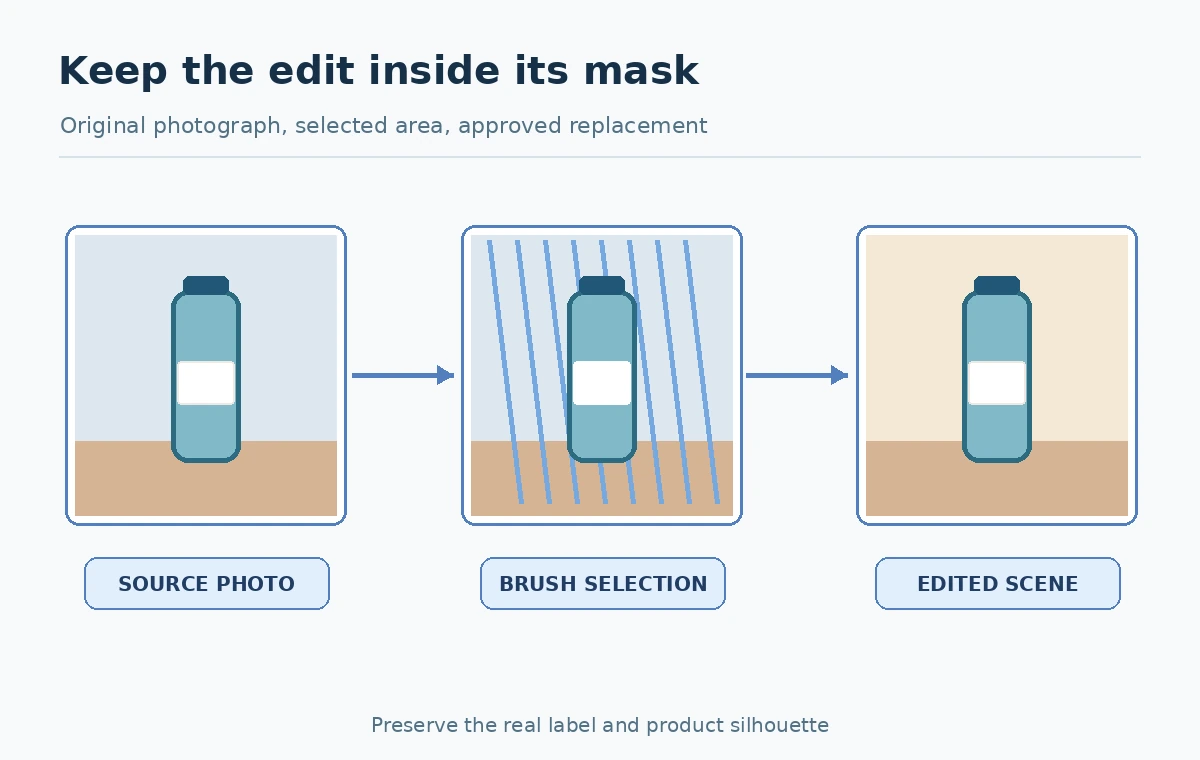
Set a narrow acceptance test: for example, the wall behind the bottle becomes pale beige, while the bottle, label and contact shadow stay consistent with the actual source. If you need a radically different camera angle, a fresh photo may be safer than asking a model to invent the unseen side of the object. Keep the untouched image available for side-by-side inspection and rollback.
Make the selection smaller than the change you fear
In the official Firefly Generative Fill documentation, Adobe describes opening an image, choosing Fill and painting over the area to change. Select More and Select Less adjust the painted region; brush size and hardness alter edge behavior. Those controls matter more than verbose prompt decoration. A loose mask that touches the logo invites the model to regenerate the logo, even if your prompt says to keep it unchanged.
Brush only the unwanted portion and allow enough surrounding context for plausible blending. For a background object, deliberately exclude the subject edge and any printed text. If the mask is ambiguous around a strap, transparent handle or hair, zoom in and inspect the selection at 100 percent. Keep a note of what was masked so a reviewer can identify which pixels were eligible for generation.
Choose Fill, Remove, or a separate background action
Do not treat all image edits as one operation. Fill can add or replace content inside a painted area using a prompt. Adobe’s Remove guide documents an object-removal route with adjustable brushing. The Firefly toolbar also offers a background-removal action. Pick the smallest operation that matches the job, rather than redrawing an entire photographed item to eliminate a tiny distraction.
A useful decision rule is: use Remove for an irrelevant object, Fill for a new approved object or patch, and a background-focused tool if the whole scene needs a different setting. Real lighting and cast shadows must still be inspected. Generative content outside the object may invent product reflections or suggest physical materials that are not present. Mark the result as an edited marketing image in your asset library.
Write prompts that describe the approved change only
Example prompt: “Replace the marked wall with a warm matte plaster surface; keep the photographed bottle, its label and the existing countertop unchanged; natural soft light; no added text or props.” The quotation is an editorial example, not an Adobe preset. It describes what should be generated, what must remain fixed and the scene’s desired lighting. Avoid absolute promises that the model will respect every exclusion. A mask and human comparison provide the stronger control.
If using a visual reference, Adobe documents adding a reference image to guide the output’s look. Use reference assets you own or are licensed to use. Do not use a competitor’s campaign image as an unexamined template. Generate a limited number of alternatives and record which details improved or deteriorated. Choose by factual preservation first, then by aesthetics.

Treat credits as a variable production input
Adobe’s credit overview explains that generative credits are consumed differently by feature and model, with plan-dependent monthly allocations. The current Fill documentation says the consumption indicator next to the Fill button displays the model’s cost. Read that on-screen number for the actual model before generating. It is not safe to assume that one edit always consumes one credit or that another person’s plan includes the same features.
For budgeting, log the selected model, displayed per-operation credit estimate, number of attempts and approved final file. You can then calculate credits per approved image from your own receipts. This guide does not provide invented averages. If an edit repeatedly changes protected details, stop generating and change the workflow rather than spending a larger budget on uncontrolled retries.
Inspect edges, lighting and identity details
Review the exported result alongside the original at full size. Zoom into printed labels, seams, shiny surfaces, hands and borders between the product and replacement scene. Ask whether the product seems to float or whether shadows have changed direction. Check whether a generated surface suggests a finish that the real item lacks. AI tools can generate a visually persuasive image while making product-defining details false.
Create a red/amber/green review entry: red if the item shape or label changed; amber if a background edge needs retouching; green only when a responsible owner confirms the edited file is appropriate for the intended placement. Keep a revision reason for each rejected attempt. A beautiful image that misrepresents the item should not pass because it looks realistic.

Export a version that can be audited
Name your approved derivative so it cannot be confused with the untouched source. Save the original, the chosen edited image, the prompt, selection notes and reviewer’s decision together. Include the dimensions, crop target and the rights status of any reference image. This archive helps collaborators understand what was generated instead of guessing from a file name or a visually seamless edit.
Preview the export at the actual placement size: hero image, social card or product-page thumbnail. A tiny irregular edge that is harmless in an atmospheric social post may be unacceptable in a large product detail photograph. Document whether the background was synthetic when that distinction is relevant to the audience.
Decide when editing should stop
A single approved background replacement can save a reshoot, but repeated attempts to fabricate complex real-world evidence are the wrong project. Stop and commission photography if the task requires a truthful new angle, exact ingredient labels, clinical outcomes, documented people or an unphotographed product configuration. Generated scenes also should not imply an endorsement or event that did not occur.
The practical deliverable is a source-and-edit comparison with a documented approval, not a tool demonstration. Firefly’s masks and references help control a creative operation, but quality control still belongs to the team publishing the image. Revisit Adobe’s live instructions before relying on an interface or credit rule in a paid workflow.
How We Research
Verification date: October 27, 2026. We checked primary official documentation: Adobe: use generative fill, Adobe: generative remove, Adobe: generative credits overview. The decision cards, scenarios and review checklists in this article are original editorial guidance based on those sources. We did not buy subscriptions, run controlled product benchmarks, or inspect private user accounts. Prices, permissions, credit rules, interfaces and license terms may change; confirm them in the product before a purchase or high-stakes project.
Frequently Asked Questions
The selection guides the edit, but compare the entire result with the source; do not assume that every protected detail is unchanged.
No. Remove addresses selected objects or regions; background removal isolates a subject from its surrounding scene.
It depends on the selected model and feature. Check the displayed credit estimate by the Fill action.
Only when your permission or license covers that use and any required releases are addressed.
No. Retain reliable photographs to show actual package shape, color, details and scale.