
A small museum may need a transparent cutout of an antique brass astrolabe for a collection card. The object looks like a circular plate, but much of its recognizable structure is empty air: open loops, pierced metal, a narrow pointer, and tiny gaps between moving parts. An automatic background mask might remove those delicate features along with the tabletop. A clean-looking graphic is not proof that the original object survived intact. This guide uses a fictional collection photo and an instructional drawing, not a tested Canva output.
The goal is not to make the astrolabe prettier or more symmetrical. A catalog cutout needs its shape, orientation, material, and documented physical features to remain truthful. When the pointer disappears, a reader might infer that a component was never present. When a hole fills with the new backdrop, the instrument can appear cast as one solid piece. Treat removal as a reversible image-editing task with the untouched photograph available for close comparison.
Prepare a clean source and record the boundaries
Start with an image the institution owns or is licensed to adapt. Save the untouched original with its inventory identifier and capture notes outside the image itself. If possible, photograph the instrument against an even, contrasting surface; sharp source edges help a reviewer distinguish brass from background. Do not sharpen or invent fine markings before making the mask. Record which tiny components are actually visible at the chosen display size, including the narrow pointer that crosses the inner ring.
Build a simple reference checklist before editing: outer circumference, any suspended loop, open holes, the pointer tip, cast shadows, and engraved lettering. The last item deserves special care because losing a letter can change identification. The checklist is not an instruction to fake missing details. If a piece is obscured in the source photo, leave it uncertain rather than drawing in a guessed replacement. Crop only enough to provide useful working room around the object.
Apply BG Remover without losing the original
Canva documents BG Remover for an image selected in the editor; the feature is available with paid plans. Duplicate the photograph within the design or keep an independent copy before applying the tool. Select the photo and choose BG Remover from the editing toolbar, then allow the automatic subject segmentation to finish. Put a contrasting temporary rectangle behind the result to make missing metal and unwanted background fragments conspicuous. The new backdrop is a diagnostic aid, not the final catalog background.
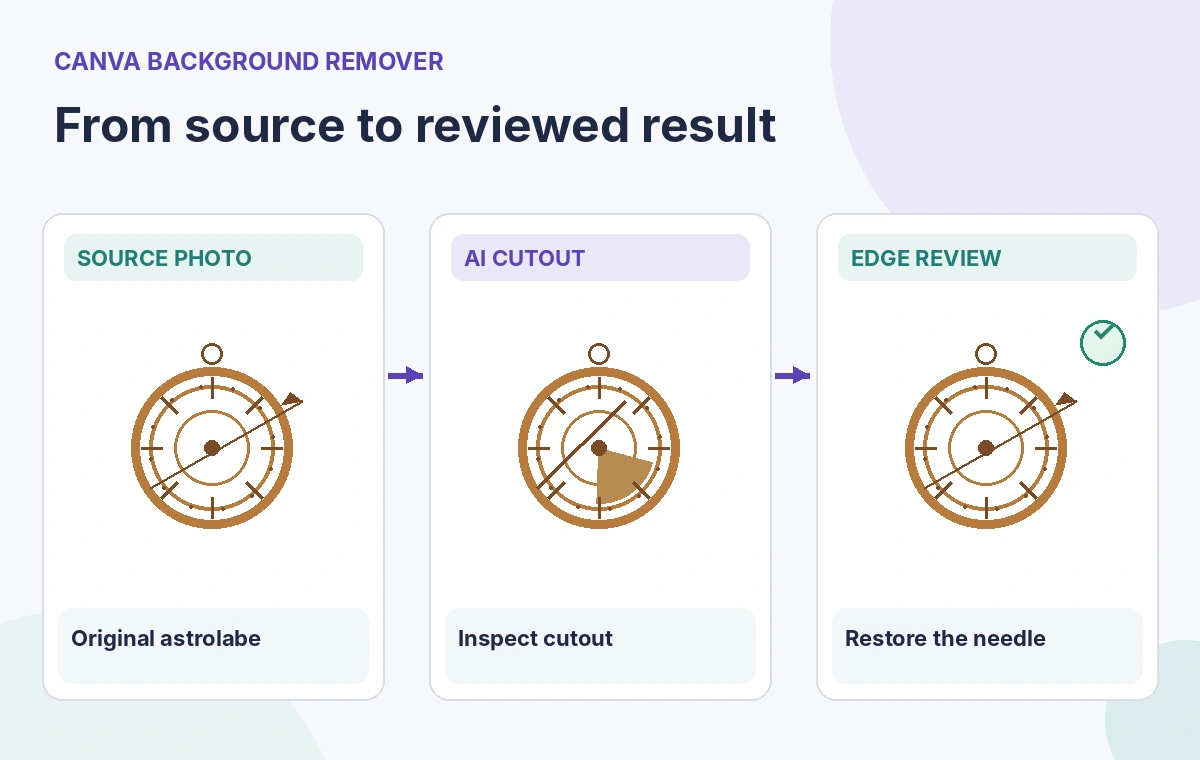
The official help page explains that the erase and restore brushes can refine the result. Reenter the background-removal controls, use Restore on metal parts that the mask deleted, and use Erase on leftover tabletop pixels. Work in short strokes that are easy to undo. Canva also provides a way to show the original while working; use that reference rather than deciding from memory where the needle should end.
Inspect holes, reflections, and fine metal edges
Metal does not always have a clean boundary against a dark surface. Reflections can look like part of the background, while deep shadows inside a cutout may be legitimate pixels. Examine the openings between rings first, then inspect the outer rim and the pointer. If one opening is incorrectly filled, erase only the background inside the true aperture. Do not erase the narrow bridge of metal that creates the shape. Compare the same crop at normal display size and at a large review zoom.
The comparison diagram shows one deliberately bad mask in which the pointer has been shortened and an opening filled. The revised illustration preserves the visible reference geometry. These are drawn examples, not measured before-and-after outputs from Canva. A careful cutout may still need a photographer or conservator to approve whether a particular dark patch is corrosion, a shadow, or removable background. Automated classification cannot settle that collection-specific judgment.
Use the AI tool selection checklist
Put the cutout into a truthful catalog layout
Once the silhouette is acceptable, place it over a plain color that does not merge with brass. Avoid synthetic drop shadows that imply the object floated or stood differently than it did in the actual photograph. If a reference scale or accession label is necessary, typeset it separately in the final design; do not ask the background tool to reconstruct small lettering in the photograph. Keep visual provenance explicit in the asset record so editors can locate the original.
For a digital catalog, test the result at thumbnail width and on a larger detail page. A rim that looks smooth at full size can alias at 200 pixels; a hairline pointer can vanish. Also check how the cutout looks on both a light and a dark background. If the transparent export develops a light fringe, revisit the mask boundary instead of hiding the defect with an elaborate background. Maintain a version that can be reopened for corrections.

Understand plan and file-size limitations
Canva says Background Remover is included with paid plans and that its photo workflow has file and pixel limits. Its help center currently lists a photo size limit below 9 MB and indicates that images above 10 megapixels can be downscaled after removal. Those constraints matter for historical object photography: a downscaled derivative may be suitable for a webpage but should not silently replace the high-resolution archival source. Check the account interface for the latest available controls.
The erase and restore mode has its own editing behavior. Canva notes limitations on zoom and undo operations while using brush mode, so practice on a duplicate and review changes after leaving the tool. If details are too small to preserve safely, a manually drawn mask in a dedicated photo editor may offer more control. A clean and accurate lower-resolution cutout is preferable to a superficially sharp image with invented physical features.
Learn to combine AI tools carefully
Use a release checklist instead of a beauty score
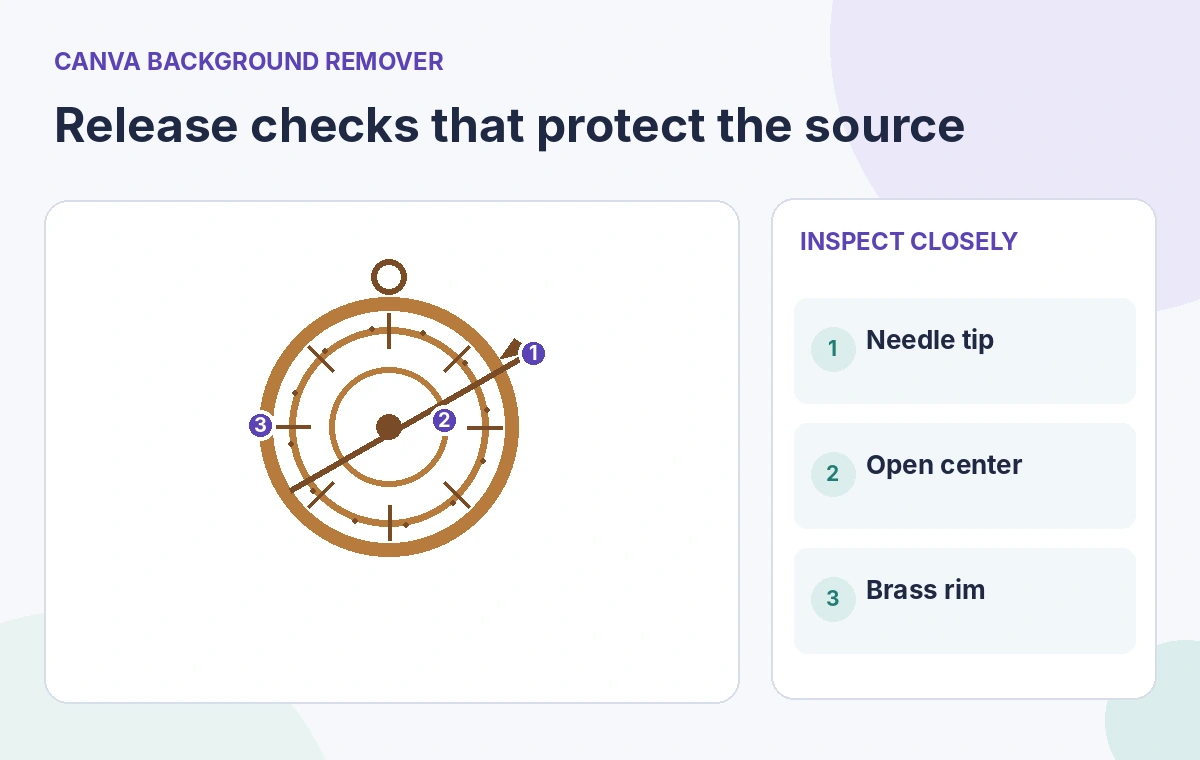
Ask someone who can see the original to compare the pointer length, circular holes, orientation, and any visible engraving. Use a layered review: the mask alone on a checkerboard, the original beside it, and the completed design at intended size. Do not let an editor who has only seen the cutout certify that it is faithful to the source. The check diagram identifies the three details most likely to be missed in a fast approval.
Document the outcome as approved, needs manual repair, or unsuitable for transparent cutout. If uncertainty remains around a corroded edge, publish the uncropped photograph instead. This conservative decision protects both the museum record and the reader. No sample astrolabe image was submitted to Canva for this article; all pictured comparisons were created as teaching diagrams.
How We Research
We checked Canva’s official Background Remover help article for the image selection workflow, brush controls, plan access, and image limits, and compared its terminology with the product overview. The astrolabe example is invented and no actual cutout, performance test, subscription entitlement, or conservation assessment is claimed. Tool availability and limits can change, so confirm them in the current account before production.
Frequently Asked Questions
No. The tool creates a mask; it does not provide evidence about a hidden object part. Restore an incorrectly removed visible part from the source or return to the original photo.
A narrow reflective feature can be mistaken for the background. Compare against the original and use the documented Restore brush to recover visible pixels.
Canva currently lists Background Remover as a paid-plan feature. Check the current plan details rather than assuming a trial or promotion includes it.
Test the transparency against contrasting colors and refine only the affected mask boundary. Do not obscure a bad edge with an artificial shadow.
Not by itself. Keep source provenance and have a responsible reviewer check the pointer, holes, inscriptions, and scale before releasing the image.